Ideation Studio: Difference between revisions
No edit summary |
|||
| (38 intermediate revisions by 4 users not shown) | |||
| Line 3: | Line 3: | ||
! colspan="6" | Table of Contents | ! colspan="6" | Table of Contents | ||
|- | |- | ||
| [https://wiki.xamun.com/wiki/Main_Page Getting Started] || [https://wiki.xamun.com/wiki/Ideation_Studio Ideation Studio] || [https://wiki.xamun.com/wiki/Design_Studio Design Studio] || [https://wiki.xamun.com/wiki/ | | [https://wiki.xamun.com/wiki/Main_Page Getting Started] || [https://wiki.xamun.com/wiki/Ideation_Studio Ideation Studio] || [https://wiki.xamun.com/wiki/Design_Studio Design Studio] || [https://wiki.xamun.com/wiki/Build_Studio Build Studio] || [https://wiki.xamun.com/wiki/Frequently_Asked_Questions FAQs] | ||
|} | |} | ||
| Line 18: | Line 18: | ||
<div style="border: 2px solid black; padding: 20px; text-align: justify;"> | <div style="border: 2px solid black; padding: 20px; text-align: justify;"> | ||
===Generate Ideas with Xami=== | ===Generate Ideas with Xami=== | ||
Xami's AI-powered Ideation Studio helps you generate and refine your ideas for designing your desired platform | Xami's AI-powered Ideation Studio helps you generate and refine your ideas for designing your desired platform. This guide will walk you through the steps to request access to the '''Ideation Studio'''. | ||
1. In the project hub, click the dropdown next to your registered email and select '''Ideation Studio'''. | 1. In the project hub, click the dropdown next to your registered email and select '''Ideation Studio'''. | ||
[[File: | [[File:Project_Hub4.png|center|750px|link=https://wiki.xamun.com/wiki/File:Project_Hub4.png]] <span style="padding-left: 100px;"></span> | ||
2. Upon entering the Ideation Studio, the '''Welcome to Xamun Ideation Studio''' message appears. | 2. Upon entering the Ideation Studio, the '''Welcome to Xamun Ideation Studio''' message appears. | ||
| Line 56: | Line 29: | ||
3. Complete all necessary information to generate the appropriate potential project by filling in the following fields. | 3. Complete all necessary information to generate the appropriate potential project by filling in the following fields. | ||
a. Select Role | |||
[[File: | b. Select Industry | ||
c. Select Purpose | |||
d. Select Technology | |||
[[File:Xami2.png|center|750px|link=https://wiki.xamun.com/wiki/File:Xami2.png]] <span style="padding-left: 100px;"> | |||
</span> | </span> | ||
| Line 68: | Line 44: | ||
''Note: Users who prefer not to fill out the form can click the '''Skip''' button, allowing them to proceed without completing the form.'' | ''Note: Users who prefer not to fill out the form can click the '''Skip''' button, allowing them to proceed without completing the form.'' | ||
[[File:Xamun Ideation | [[File:Xamun Ideation Studio2.png|center|750px|link=https://wiki.xamun.com/wiki/File:Xamun_Ideation_Studio2.png]] <span style="padding-left: 100px;"> | ||
</span> | </span> | ||
| Line 77: | Line 53: | ||
''Note: These suggestions are generated by Xami based on the information you entered in the form.'' | ''Note: These suggestions are generated by Xami based on the information you entered in the form.'' | ||
[[File:Xami | [[File:Xami Suggestions2.png|center|750px|link=https://wiki.xamun.com/wiki/File:Xami_Suggestions2.png]] <span style="padding-left: 100px;"> | ||
</span> | </span> | ||
7. When you click on one of Xami’s suggestions, it will automatically be added to your project backlog. | 7. When you click on one of Xami’s suggestions, it will automatically be added to your project backlog. | ||
'''Reference Material''' | |||
{| class="wikitable mw-collapsible" style="width:100%;" | {| class="wikitable mw-collapsible" style="width:100%;" | ||
| Line 92: | Line 71: | ||
| style="border: 2px solid black; background-color: #f2f2f2;" | Select Purpose || style="border: 1px solid black; background-color: white;" | • Select purpose to utilize. <br> • Required field | | style="border: 2px solid black; background-color: #f2f2f2;" | Select Purpose || style="border: 1px solid black; background-color: white;" | • Select purpose to utilize. <br> • Required field | ||
|- | |- | ||
| style="border: 2px solid black; background-color: #f2f2f2;" | Select Technology || style="border: 1px solid black; background-color: white;" | • Select innovative technologies. <br> • Required field | | style="border: 2px solid black; background-color: #f2f2f2;" | Select Technology || style="border: 1px solid black; background-color: white;" | • Select innovative technologies. <br> • Required field | ||
|- | |- | ||
| style="border: 2px solid black; background-color: #f2f2f2;" | Skip || style="border: 1px solid black; background-color: white;" | • It will redirect to Project Backlog. <br> • You can add manually or ask AI advisor for your new solution. | | style="border: 2px solid black; background-color: #f2f2f2;" | Skip || style="border: 1px solid black; background-color: white;" | • It will redirect to Project Backlog. <br> • You can add manually or ask AI advisor for your new solution. | ||
| Line 99: | Line 78: | ||
|} | |} | ||
''Updated on: | ''Updated on: 09/11/2024'' | ||
</div><br> | </div><br> | ||
| Line 108: | Line 87: | ||
Project Backlogs presents the ideation process with providing users their progress and on-going ideations. <!--Users access a user-generated catalog of ideas, swiftly identifying priorities with the Priority filter. Active projects are readily accessible, while the Archive ensures past insights are preserved for future reference. With this intuitive tool, innovation flows seamlessly from conception to execution.--> | Project Backlogs presents the ideation process with providing users their progress and on-going ideations. <!--Users access a user-generated catalog of ideas, swiftly identifying priorities with the Priority filter. Active projects are readily accessible, while the Archive ensures past insights are preserved for future reference. With this intuitive tool, innovation flows seamlessly from conception to execution.--> | ||
[[File:Backlog.png|center|750px|link=https://wiki.xamun.com/images/5/5a/Backlog.png]] <span style="padding-left: 100px;"> | [[File:Backlog.png|center|750px|link=https://wiki.xamun.com/images/5/5a/Backlog.png]] <span style="padding-left: 100px;"> | ||
'''Reference Material''' | |||
{| class="wikitable mw-collapsible" style="width:100%;" | {| class="wikitable mw-collapsible" style="width:100%;" | ||
| Line 120: | Line 101: | ||
===Navigate Project Backlog=== | ===Navigate Project Backlog=== | ||
The Xamun Project Backlog is where projects are managed and organized. In this guide, you will learn how to navigate, prioritize, and track tasks efficiently to ensure your project's success. <br> | |||
1. Click the dropdown button on the right next to your email. <br> | |||
2. Select '''‘Ideation Studio’'''. | |||
[[File:Projecthub menu ideation studio.png|center|700px|link=https://https://wiki.xamun.com/wiki/File:Projecthub_menu_ideation_studio.png]] <span style="padding-left: 350px;"> | |||
3. You will be taken to the "Welcome to Xamun Ideation Studio" page. If you have existing solutions, click the '''Skip''' button. <br> <br> | |||
''Note: For additional ideas, you can seek assistance from Xamantha in planning your projects. Fill out the form and click on '''Recommend Potential Projects''' when finished.'' | |||
[[File:Iseation stusio skip.png|center|700px|link=https://https://wiki.xamun.com/wiki/File:Iseation_stusio_skip.png]] <span style="padding-left: 350px;"> | |||
4. You will then be directed to the Project Backlog. <br> | |||
5. The dropdown ▼ next to your registered email is where you can navigate between Xamun’s solutions. <br> | |||
6. Add button <br> | |||
7. Solution Advisor Credits <br> | |||
8. You will find sections such as: Ideation, Priority, Active, and Archive. | |||
[[File:Project backlog features.png|center|700px|link=https://https://wiki.xamun.com/wiki/File:Project backlog features.png]] <span style="padding-left: 350px;"> | |||
''Note: The Ideation section is the default area in the Project Backlog.'' | |||
'''Reference Material''' | |||
{| class="wikitable mw-collapsible" style="width:100%;" | |||
! style="border: 2px solid black;" | Feature | |||
! style="border: 2px solid black;" | Description | |||
|- | |||
| style="border: 2px solid black; background-color: #f2f2f2;" | Add Project (+) Button || style="border: 1px solid black; background-color: white;" | • It will let you choose if the solution will be added manually or through Xamantha AI. | |||
|- | |||
| style="border: 2px solid black; background-color: #f2f2f2;" | Solution Advisor Credits || style="border: 1px solid black; background-color: white;" | • Solution credit limit. <br>• Limited to 10 solutions per account. | |||
|} | |||
''Updated on: 08/19/2024'' | |||
===Ideation=== | ===Ideation=== | ||
| Line 139: | Line 155: | ||
[[File:Ideation - archive.png|center|700px|link=https://https://https://https://https://wiki.xamun.com/wiki/File:Ideation_-_archive.png]] <span style="padding-left: 350px;"> | [[File:Ideation - archive.png|center|700px|link=https://https://https://https://https://wiki.xamun.com/wiki/File:Ideation_-_archive.png]] <span style="padding-left: 350px;"> | ||
'''Reference Material''' | |||
{| class="wikitable mw-collapsible" style="width:100%;" | {| class="wikitable mw-collapsible" style="width:100%;" | ||
| Line 203: | Line 221: | ||
10. Click the 'Save' button to apply the changes. | 10. Click the 'Save' button to apply the changes. | ||
'''Reference Material''' | |||
{| class="wikitable mw-collapsible" style="width:100%;" | {| class="wikitable mw-collapsible" style="width:100%;" | ||
| Line 217: | Line 237: | ||
| style="border: 2px solid black; background-color: #f2f2f2;" | Build with Xamun || style="border: 1px solid black; background-color: white;" | • It will redirect to Design Studio. | | style="border: 2px solid black; background-color: #f2f2f2;" | Build with Xamun || style="border: 1px solid black; background-color: white;" | • It will redirect to Design Studio. | ||
|} | |} | ||
''Updated on: 08/01/2024'' | ''Updated on: 08/01/2024'' | ||
| Line 225: | Line 244: | ||
[[File:Active Landing Page.png|center|750px|link=https://https://wiki.xamun.com/wiki/File:Active_Landing_Page.png]] <span style="padding-left: 100px;"> | [[File:Active Landing Page.png|center|750px|link=https://https://wiki.xamun.com/wiki/File:Active_Landing_Page.png]] <span style="padding-left: 100px;"> | ||
'''Reference Material''' | |||
{| class="wikitable mw-collapsible" style="width:100%;" | {| class="wikitable mw-collapsible" style="width:100%;" | ||
| Line 249: | Line 270: | ||
[[File:Archive Projects.png|center|750px|link=https://https://https://wiki.xamun.com/wiki/File:Archive_Projects.png]] <span style="padding-left: 100px;"> | [[File:Archive Projects.png|center|750px|link=https://https://https://wiki.xamun.com/wiki/File:Archive_Projects.png]] <span style="padding-left: 100px;"> | ||
'''Reference Material''' | |||
{| class="wikitable mw-collapsible" style="width:100%;" | {| class="wikitable mw-collapsible" style="width:100%;" | ||
| Line 273: | Line 296: | ||
Create Project Manually allows you to manually input specific project details, customizing each aspect according to your needs and preferences. This guide will explain how to manually create a project on the platform. | Create Project Manually allows you to manually input specific project details, customizing each aspect according to your needs and preferences. This guide will explain how to manually create a project on the platform. | ||
1. In Ideation Studio, fill-up the required information and click on '''Recommend Potential Projects''' to generate suggestions. Click on '''Skip''' to proceed to Ideation Studio Project Backlog. | 1. In Ideation Studio, fill-up the required information and click on '''Recommend Potential Projects''' to generate suggestions. Click on '''Skip''' to proceed to the Ideation Studio Project Backlog. | ||
[[File: | [[File:Xami3.png|center|750px|link=https://wiki.xamun.com/wiki/File:Xami3.png]] <span style="padding-left: 100px;"> | ||
</span> | </span> | ||
2. Click on the '''+''' button in the upper left corner and select '''Add Manually.''' | 2. Click on the '''+''' button in the upper left corner and select '''Add Manually.''' | ||
[[File:Add Manually.png|center|750px|link=https://wiki.xamun.com/wiki/File: | [[File:Click Add Manually.png|center|750px|link=https://wiki.xamun.com/wiki/File:Click_Add_Manually.png]] <span style="padding-left: 100px;"> | ||
</span> | </span> | ||
3. Provide the information details needed as it is required to be filled out and click on '''Proceed.''' | 3. Provide the information details needed as it is required to be filled out and click on '''Proceed.''' | ||
a. Project Name | |||
b. Objective | |||
c. Description | |||
d. Module Name | |||
[[File:Create Project.png|center|750px|link=https://wiki.xamun.com/wiki/File:Create_Project.png]] <span style="padding-left: 100px;"> | [[File:Create Project.png|center|750px|link=https://wiki.xamun.com/wiki/File:Create_Project.png]] <span style="padding-left: 100px;"> | ||
| Line 298: | Line 321: | ||
4. Your Project will be added to the Ideation Studio Project Backlog. | 4. Your Project will be added to the Ideation Studio Project Backlog. | ||
''Note: You can edit whatever details you want, archive, request cost, calculate ROI, add | ''Note: You can edit whatever details you want, archive, request cost, calculate ROI, add modules, or even build with Xamun.'' | ||
[[File:Added Project in Ideation Studio Project Backlog.png|center|750px|link=https://wiki.xamun.com/wiki/File:Added_Project_in_Ideation_Studio_Project_Backlog.png]] <span style="padding-left: 100px;"> | [[File:Added Project in Ideation Studio Project Backlog.png|center|750px|link=https://wiki.xamun.com/wiki/File:Added_Project_in_Ideation_Studio_Project_Backlog.png]] <span style="padding-left: 100px;"> | ||
| Line 320: | Line 343: | ||
|} | |} | ||
''Updated on: 08/ | ''Updated on: 08/07/2024'' | ||
===Create Project with a Solution Advisor=== | ===Create Project with a Solution Advisor=== | ||
Creating a Project with a Solution Advisor helps you to design and launch projects effectively by guiding you through key steps such as defining objectives, selecting roles, and choosing appropriate technologies. This guide will show you how to use the Solution Advisor to create your project. | |||
1. In the upper left corner of Xamun Project Backlog, click the '''+''' button and select '''Ask Solution Advisor.''' You will be redirected to Ideation Studio and the '''Welcome to Xamun Ideation Studio''' message appears. | 1. In the upper left corner of Xamun Project Backlog, click the '''+''' button and select '''Ask Solution Advisor.''' You will be redirected to Ideation Studio and the '''Welcome to Xamun Ideation Studio''' message appears. | ||
[[File:Ask Solution Advisor.png|center|750px|link=https://wiki.xamun.com/wiki/File: | [[File:Click Ask Solution Advisor.png|center|750px|link=https://wiki.xamun.com/wiki/File:Click_Ask_Solution_Advisor.png]] <span style="padding-left: 100px;"> | ||
</span> | </span> | ||
2. Complete all necessary information to generate the appropriate potential project by filling in the following fields. And click on Recommend Projects. | 2. Complete all necessary information to generate the appropriate potential project by filling in the following fields. And click on '''Recommend Potential Projects'''. | ||
a. Select Role | |||
b. Select Industry | |||
c. Select Purpose | |||
d. Select Technology | |||
[[File: | [[File:Xami4.png|center|750px|link=https://wiki.xamun.com/wiki/File:Xami4.png]] <span style="padding-left: 100px;"> | ||
</span> | </span> | ||
3. These suggestions are generated by Xami based on the information you entered in the form. | 3. These suggestions are generated by Xami based on the information you entered in the form. | ||
[[File:Xami's Recommended | [[File:Xami's Recommended Projects4.png|center|750px|link=https://wiki.xamun.com/wiki/File:Xami%27s_Recommended_Projects4.png]] <span style="padding-left: 100px;"> | ||
</span> | </span> | ||
4. When you click on one of | 4. When you click on one of Xami’s suggestions, it will automatically be added to your project backlog. | ||
''Note: You can edit whatever details you want, archive, request cost, calculate ROI, add | ''Note: You can edit whatever details you want, archive, request cost, calculate ROI, add modules, or even build with Xamun.'' | ||
[[File: | [[File:Crop Quality Detector.png|center|750px|link=https://wiki.xamun.com/wiki/File:Crop_Quality_Detector.png]] <span style="padding-left: 100px;"> | ||
</span> | </span> | ||
| Line 369: | Line 392: | ||
| style="border: 2px solid black; background-color: #f2f2f2;" | Technology || style="border: 1px solid black; background-color: white;" | • Select innovative technologies. <br> • Required Field | | style="border: 2px solid black; background-color: #f2f2f2;" | Technology || style="border: 1px solid black; background-color: white;" | • Select innovative technologies. <br> • Required Field | ||
|- | |- | ||
| style="border: 2px solid black; background-color: #f2f2f2;" | Skip || style="border: 1px solid black; background-color: white;" | • It will redirect to Project Backlog. <br> • You can add manually or ask AI advisor for your new solution. | | style="border: 2px solid black; background-color: #f2f2f2;" | Skip || style="border: 1px solid black; background-color: white;" | • It will redirect to Project Backlog. <br> • You can add manually or ask an AI advisor for your new solution. | ||
|- | |- | ||
| style="border: 2px solid black; background-color: #f2f2f2; text-align: left" | Recommend Potential Projects || style="border: 1px solid black; background-color: white;" | • By clicking this button, | | style="border: 2px solid black; background-color: #f2f2f2; text-align: left" | Recommend Potential Projects || style="border: 1px solid black; background-color: white;" | • By clicking this button, Xami will generate a list of strategic projects. | ||
|} | |} | ||
<br> | <br> | ||
''Updated on: 08/ | ''Updated on: 08/07/2024'' | ||
</div> | </div> | ||
<br> | <br> | ||
| Line 388: | Line 411: | ||
1. In the Xamun Project Backlog, click on the '''+''' button in the upper left corner. Select '''Add Manually''' to create a new project. | 1. In the Xamun Project Backlog, click on the '''+''' button in the upper left corner. Select '''Add Manually''' to create a new project. | ||
[[File:Add | [[File:Click the Add Manually.png|center|750px|link=https://wiki.xamun.com/wiki/File:Click_the_Add_Manually.png]] <span style="padding-left: 100px;"> | ||
</span> | </span> | ||
2. Type in the module name and provide other required information then click on the '''+''' button. | 2. Type in the module name and provide other required information then click on the '''+''' button. | ||
a. Project Name | |||
b. Objective | |||
c. Description | |||
d. Module Name | |||
[[File:Create Project.png|center|750px|link=https://wiki.xamun.com/wiki/File:Create_Project.png]] <span style="padding-left: 100px;"> | [[File:Create Project.png|center|750px|link=https://wiki.xamun.com/wiki/File:Create_Project.png]] <span style="padding-left: 100px;"> | ||
| Line 423: | Line 446: | ||
|} | |} | ||
''Updated on: 08/ | ''Updated on: 08/07/2024'' | ||
===Add Module with a Solution Advisor=== | ===Add Module with a Solution Advisor=== | ||
| Line 430: | Line 453: | ||
1. In the Xamun Project Backlog, click on the '''+''' button in the upper left corner. Select '''Ask Solution Advisor''' to create a new project. | 1. In the Xamun Project Backlog, click on the '''+''' button in the upper left corner. Select '''Ask Solution Advisor''' to create a new project. | ||
[[File:Add | [[File:Just click Add Manually.png|center|750px|link=https://wiki.xamun.com/wiki/File:Just_click_Add_Manually.png]] <span style="padding-left: 100px;"> | ||
</span> | </span> | ||
2. Provide the information details needed then click on '''Proceed.''' | 2. Provide the information details needed then click on '''Proceed.''' | ||
a. Project Name | |||
b. Objective | |||
c. Description | |||
d. Module Name | |||
[[File:Create Project2.png|center|750px|link=https://wiki.xamun.com/wiki/File:Create_Project2.png]] <span style="padding-left: 100px;"> | [[File:Create Project2.png|center|750px|link=https://wiki.xamun.com/wiki/File:Create_Project2.png]] <span style="padding-left: 100px;"> | ||
| Line 448: | Line 471: | ||
3. Xami will generate suggestions for modules that are suitable for your project. Then click on '''Proceed.''' | 3. Xami will generate suggestions for modules that are suitable for your project. Then click on '''Proceed.''' | ||
[[File: | [[File:Suggested Modules.png|center|750px|link=https://wiki.xamun.com/wiki/File:Suggested_Modules.png]] <span style="padding-left: 100px;"> | ||
</span> | </span> | ||
| Line 474: | Line 497: | ||
<br> | <br> | ||
''Updated on: 08/ | ''Updated on: 08/07/2024'' | ||
</div> | </div> | ||
<br> | <br> | ||
| Line 550: | Line 573: | ||
|} | |} | ||
''Updated on: 08/05/2024'' | ''Updated on: 08/05/2024'' | ||
===Calculate ROI to Build a New Business=== | ===Calculate ROI to Build a New Business=== | ||
| Line 619: | Line 639: | ||
|} | |} | ||
''Updated on: 08/05/2024'' | ''Updated on: 08/05/2024'' | ||
===Calculate ROI to Reduce Cost=== | ===Calculate ROI to Reduce Cost=== | ||
| Line 689: | Line 706: | ||
5. A message will appear at the bottom of your screen confirming that your progress | 5. A message will appear at the bottom of your screen confirming that your progress | ||
has been saved successfully. | has been saved successfully. | ||
'''Reference Material''' | |||
{| class="wikitable mw-collapsible" style="width:100%;" | {| class="wikitable mw-collapsible" style="width:100%;" | ||
| Line 704: | Line 723: | ||
</div> | </div> | ||
<br> | <br> | ||
Latest revision as of 15:30, 11 September 2024
| Table of Contents | |||||
|---|---|---|---|---|---|
| Getting Started | Ideation Studio | Design Studio | Build Studio | FAQs | |
Access to Ideation Studio
Ideation Studio
The Design Studio is where the users can generate their desired platform. Users can interact with Xami, an AI advisory of the Xamun Website that assists users in planning the layout of their platform. This will lessen the time the user has to ideate and execute the supposed solution and will serve a convenient approach. In addition, the cost estimates of the Ideation Studio is similar to the Build Studio, they only differ in functionalities, and it will be discussed accordingly below.
Updated on: 07/11/2024
Generate Ideas with Xami
Xami's AI-powered Ideation Studio helps you generate and refine your ideas for designing your desired platform. This guide will walk you through the steps to request access to the Ideation Studio.
1. In the project hub, click the dropdown next to your registered email and select Ideation Studio.

2. Upon entering the Ideation Studio, the Welcome to Xamun Ideation Studio message appears.
3. Complete all necessary information to generate the appropriate potential project by filling in the following fields.
a. Select Role
b. Select Industry
c. Select Purpose
d. Select Technology

4. After completing the form, click the Recommend Potential Projects button so Xami can proceed to generate suggestions.
Note: Users who prefer not to fill out the form can click the Skip button, allowing them to proceed without completing the form.

5. Clicking Recommend Potential Projects or Skip will take you to the Xami AI Ideation Studio Project Backlog.
6. Within the Project Backlog, there is a chat box available where you’ll find Xami’s suggestions.
Note: These suggestions are generated by Xami based on the information you entered in the form.

7. When you click on one of Xami’s suggestions, it will automatically be added to your project backlog.
Reference Material
| Feature | Description |
|---|---|
| Select Role | • Select a role that suits your desired project. • Required field |
| Select Industry | • Select which industry you would like to apply your desired project. • Required field |
| Select Purpose | • Select purpose to utilize. • Required field |
| Select Technology | • Select innovative technologies. • Required field |
| Skip | • It will redirect to Project Backlog. • You can add manually or ask AI advisor for your new solution. |
| Recommend Potential Projects | • By clicking this button, Xami will generate a list of strategic projects. |
Updated on: 09/11/2024
Project Backlog
Project Backlogs presents the ideation process with providing users their progress and on-going ideations.
Reference Material
| Feature | Description |
|---|---|
| Add Project (+) Button | • It will let you to choose if the solution will add manually or thru Xamantha AI. |
| Solution Advisor Credits | • Solution credit limit. • Limited to 10 solutions per account. |
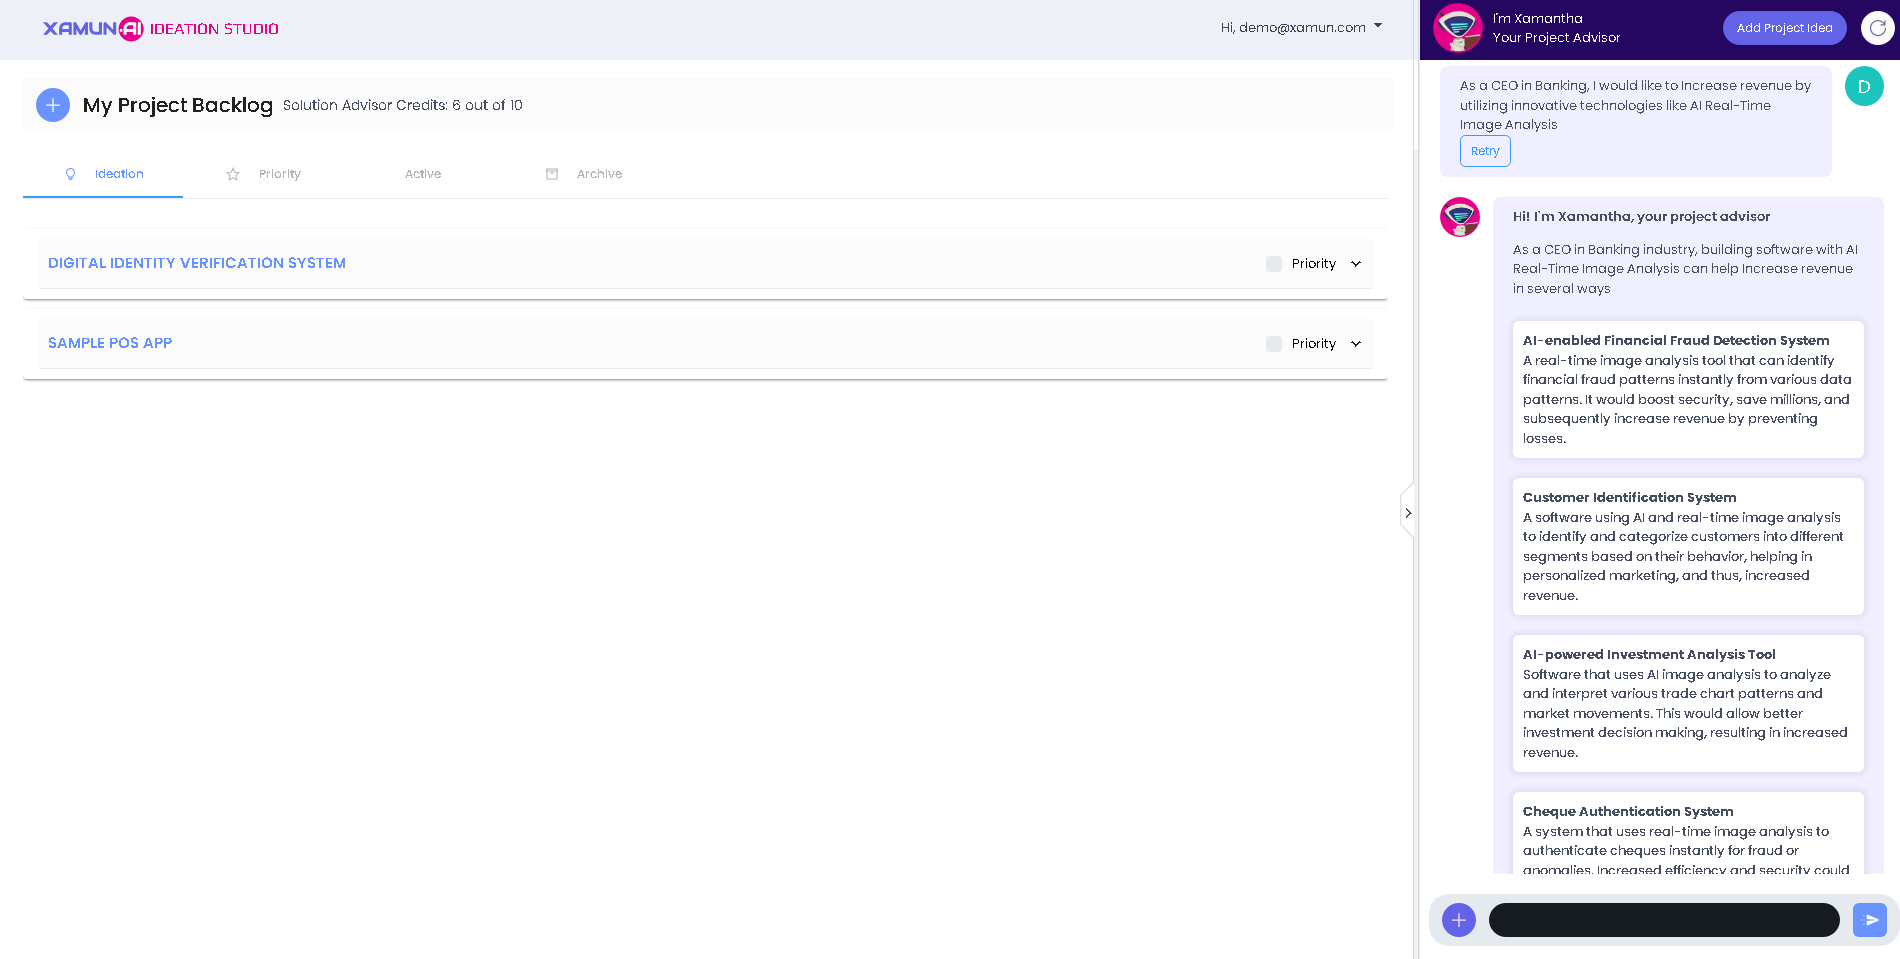
The Xamun Project Backlog is where projects are managed and organized. In this guide, you will learn how to navigate, prioritize, and track tasks efficiently to ensure your project's success.
1. Click the dropdown button on the right next to your email.
2. Select ‘Ideation Studio’.

3. You will be taken to the "Welcome to Xamun Ideation Studio" page. If you have existing solutions, click the Skip button.
Note: For additional ideas, you can seek assistance from Xamantha in planning your projects. Fill out the form and click on Recommend Potential Projects when finished.

4. You will then be directed to the Project Backlog.
5. The dropdown ▼ next to your registered email is where you can navigate between Xamun’s solutions.
6. Add button
7. Solution Advisor Credits
8. You will find sections such as: Ideation, Priority, Active, and Archive.

Note: The Ideation section is the default area in the Project Backlog.
Reference Material
| Feature | Description |
|---|---|
| Add Project (+) Button | • It will let you choose if the solution will be added manually or through Xamantha AI. |
| Solution Advisor Credits | • Solution credit limit. • Limited to 10 solutions per account. |
Updated on: 08/19/2024
Ideation
1. To view the project details, click on the project name or the dropdown button beside “Priority”.
2. To display the available modules in the project, click on the down arrow button on the left.

3. To prioritize a project, click the checkbox labeled "Priority." This will help you prioritize important projects, as they will be displayed in the Priority section.
4. Click the ‘Request Cost’ button to get an estimated cost to build your solution.

5. To confirm your request, click the ‘Request Cost’ button.

6. Click the 'Archive' button to remove a project from the Ideation board. This action will move the project to the archive column.

Reference Material
| Feature | Description |
|---|---|
| Project List | • It contains the list of your selected solutions. |
| Priority | • Make your solution added to the priority list. |
| Module List | • Selected modules for your solution. |
| Short Description | • Details about your solution. |
| Add Module | • You can add manually or use Xamy AI to generate modules for your solution. |
| Archive | • Hide or move your solution to archive list. |
| Request Cost | • It will prompt a meeting with the Xamun Team for your selected solution. |
| Calculate ROI | • It will show ROI Calculator for Reduce Cost. |
| Build with Xamun | • It will redirect to Design Studio. |
Updated on: 08/01/2024
Priority
1. In the project backlog landing page, click the 'Priority' label to view your prioritized projects.

2. You can edit the cost value by tapping on the text box under 'Build cost' that corresponds to the project you wish to edit.
3. Click the 'bell' icon to request a cost estimate for your project.
- The cost estimate request message will appear on your screen.
- Click the ‘Cancel’ button to disregard the action.
- Click the ‘Request Cost’ button to send the request.

4. Click the ‘Calculate’ button under the ‘Est.Benefits per year’ label.
- The ROI Calculator will appear on the right side of your screen.
- Click the ‘Save Result’ button to save your result.
- After the calculation, you will find the updated value in the 'Yearly Cost' column.

5. To view your project details, click on your project name.

6. To edit your project name, tap on the textbox under ‘Project Name’.
7. To update your project description, tap on the textbox under the ‘Description’.
8. To see the objective options, click the dropdown button.
- Select one category from the options.
- Your selected category will be displayed under the ‘Objective’ label.
9. To add a module, type its name into the text box next to its label then click the ‘+’ icon.

Note: To close project details, click the ‘Cancel’ button, the ‘Back’ button, or the ‘x’ icon in the top-right corner.
10. Click the 'Save' button to apply the changes.
Reference Material
| Feature | Description |
|---|---|
| Bell Button | • It will prompt a meeting with the Xamun Team for your selected solution. |
| Calculate (Est. Benefits per year) | • It will show the ROI Calculator. • It will also calculate the estimated challenge. |
| Calculate (Est. Challenge) | • It will show the ROI Calculator to calculate estimated challenges. |
| Build with Xamun | • It will redirect to Design Studio. |
Updated on: 08/01/2024
Active
From your project backlog landing page, click the ‘Active’ label to view your active projects.

Reference Material
| Feature | Description |
|---|---|
| Bell Button | • It will prompt a meeting with the Xamun Team for your selected solution. |
| Calculate (Est. Benefits per year) | • It will show the ROI Calculator. • It will also calculate the estimated challenge. |
| Calculate (Est. Challenge) | • It will show the ROI Calculator to calculate estimated challenges. |
| Build with Xamun | • It will redirect to Design Studio. |
Updated on: 08/05/2024
Archive
1. From your project backlog landing page, click the 'Archive' label to view your archived projects.

You will see the list of all your archive projects.

Reference Material
| Feature | Description |
|---|---|
| Bell Button | • It will prompt a meeting with the Xamun Team for your selected solution. |
| Calculate (Est. Benefits per year) | • It will show the ROI Calculator. • It will also calculate the estimated challenge. |
| Calculate (Est. Challenge) | • It will show the ROI Calculator to calculate estimated challenges. |
| Build with Xamun | • It will redirect to Design Studio. |
Updated on: 08/05/2024
Create Project
Create Project Manually
Create Project Manually allows you to manually input specific project details, customizing each aspect according to your needs and preferences. This guide will explain how to manually create a project on the platform.
1. In Ideation Studio, fill-up the required information and click on Recommend Potential Projects to generate suggestions. Click on Skip to proceed to the Ideation Studio Project Backlog.

2. Click on the + button in the upper left corner and select Add Manually.

3. Provide the information details needed as it is required to be filled out and click on Proceed.
a. Project Name
b. Objective
c. Description
d. Module Name

4. Your Project will be added to the Ideation Studio Project Backlog.
Note: You can edit whatever details you want, archive, request cost, calculate ROI, add modules, or even build with Xamun.

Reference Material
| Feature | Description |
|---|---|
| Project Name | • Enter the name of your project. • Required Field |
| Objective | • State the objective of your project. • Required Field |
| Description | • Provide a brief description of your project. • Required Field |
| Module Name | • Specify the module name. |
| Proceed | • Click this button to move forward. By clicking this button, the project will be created. |
Updated on: 08/07/2024
Create Project with a Solution Advisor
Creating a Project with a Solution Advisor helps you to design and launch projects effectively by guiding you through key steps such as defining objectives, selecting roles, and choosing appropriate technologies. This guide will show you how to use the Solution Advisor to create your project.
1. In the upper left corner of Xamun Project Backlog, click the + button and select Ask Solution Advisor. You will be redirected to Ideation Studio and the Welcome to Xamun Ideation Studio message appears.

2. Complete all necessary information to generate the appropriate potential project by filling in the following fields. And click on Recommend Potential Projects.
a. Select Role
b. Select Industry
c. Select Purpose
d. Select Technology

3. These suggestions are generated by Xami based on the information you entered in the form.

4. When you click on one of Xami’s suggestions, it will automatically be added to your project backlog.
Note: You can edit whatever details you want, archive, request cost, calculate ROI, add modules, or even build with Xamun.

Reference Material
| Feature | Description |
|---|---|
| Role | • Select a role that suits your desired project. • Required Field |
| Industry | • Select which industry you would like to apply your desired project. • Required Field |
| Purpose | • Select purpose to utilize. • Required Field |
| Technology | • Select innovative technologies. • Required Field |
| Skip | • It will redirect to Project Backlog. • You can add manually or ask an AI advisor for your new solution. |
| Recommend Potential Projects | • By clicking this button, Xami will generate a list of strategic projects. |
Updated on: 08/07/2024
Add Modules to a Project
Add Modules Manually
Add Modules Manually allows you to manually input specific modules for your project, offering customization and control over each module included. This guide explains how to manually add modules to your project on the platform.
1. In the Xamun Project Backlog, click on the + button in the upper left corner. Select Add Manually to create a new project.

2. Type in the module name and provide other required information then click on the + button.
a. Project Name
b. Objective
c. Description
d. Module Name
3. After completing all necessary information, click Proceed. It will automatically be added in the Ideation Studio Project Backlog.
Reference Material
| Feature | Description |
|---|---|
| Project Name | • Enter the name of your project. • Required Field |
| Objective | • State the objective of your project. • Required Field |
| Description | • Provide a brief description of your project. • Required Field |
| Module Name | • Specify the module name. |
| Proceed | • Click this button to move forward. By clicking this button, the project will be created. |
Updated on: 08/07/2024
Add Module with a Solution Advisor
Add Module with a Solution Advisor allows you to integrate new modules with the guidance of Xami, ensuring they align with your needs and preferences. This guide will explain how to add a module using a Solution Advisor.
1. In the Xamun Project Backlog, click on the + button in the upper left corner. Select Ask Solution Advisor to create a new project.

2. Provide the information details needed then click on Proceed.
a. Project Name
b. Objective
c. Description
d. Module Name

3. Xami will generate suggestions for modules that are suitable for your project. Then click on Proceed.

4. It will automatically be added in the Ideation Studio Project Backlog.

Reference Material
| Feature | Description |
|---|---|
| Project Name | • Enter the name of your project. • Required Field |
| Objective | • State the objective of your project. • Required Field |
| Description | • Provide a brief description of your project. • Required Field |
| Module Name | • Specify the module name. |
| Proceed | • Click this button to move forward. By clicking this button, the project will be created. |
Updated on: 08/07/2024
ROI Calculator
Calculate ROI to Increase Revenue
Calculating return on investment (ROI) helps businesses allocate resources efficiently. This guide will show you how to calculate ROI.
1. In My Project Backlog, click on Active to see the complete list of projects. Click on Calculate under the Est. Benefits per year to show the ROI for Increase Revenue.

2. Provide the required information in the ROI Calculator. You can re-calculate your ROI anytime in case you decide to change the information. Click on Save Result.
Note: The + and dropdown button beside the re-calculate is non-functional.
- Increase Revenue
- New Customers
- Average annual revenues/customer
- Increase Order Size/Customer
- Total number of customers impacted
- Average order amount/customer
- Increase in order size/customer
- Increase Order Frequency
- Total number of customers impacted
- Average order amount/customer
- Average order frequency/customer
- Increase in order frequency/customer

3. To request for project costing click on the bell icon.
4. Click on the Request Cost button.
Note: When you request a cost, the admin will receive the request. Wait for the admin to send the cost estimate.

5. Click on Build with Xamun to proceed with your project.

6. You will be redirected to the Design Studio and can start creating your application.

Reference Material
| Feature | Description |
|---|---|
| Increase Revenue | • Strategies and actions aimed at boosting the overall income generated by the business. |
| Increase Order Size/Customer | • Methods to encourage customers to purchase more items or higher-value items in each transaction. |
| Increase Order Frequency | • Tactics to motivate customers to make purchases more often. |
| Re-calculate | • Click this button to reset all calculations and start encoding the data again. |
| Save Result | • Click this button to save the current calculations and results for future reference. |
Updated on: 08/05/2024
Calculate ROI to Build a New Business
This helps entrepreneurs to evaluate the potential return on investment (ROI) for a new business venture. By helping to allocate resources efficiently and make informed decisions. This guide will show you how to calculate ROI and use these insights to make decisions that enhance your business's growth and profitability.
1. In My Project Backlog, click Active to see the complete list for projects created. Click the Calculate under the Est. Benefits per year to calculate ROI for Build a New Business.

2. In the ROI Calculator fill up the required information and click on Save Result.
Note: You can re-calculate your ROI anytime you want in case you decide to change the information you input.
- Total Addressable Market (TAM)
- Serviceable Addressable Market (SAM %)
- Serviceable Obtainable Market (SOM %)
- Av. Rev/Customer
- Av. Cost/Customer

3. To request for project costing click on the bell icon.

4. Click on the Request Cost button.
Note: When you request a cost, the admin will receive the request. Wait for the admin to send the cost estimate.

5. Click on Build with Xamun to proceed with your project.

6. You will be redirected to the Design Studio and can start creating your application.

Reference Material
| Feature | Description |
|---|---|
| Total Addressable Market (TAM) | • The overall revenue opportunity available if 100% market share was achieved. |
| Serviceable Addressable Market (SAM %) | • The percentage of TAM that you can realistically serve with your products or services. |
| Serviceable Obtainable Market (SOM %) | • The percentage of SAM that you can capture, considering competition and other constraints. |
| Av. Rev/Customer | • The average revenue generated per customer. |
| Av. Cost/Customer | • The average cost incurred per customer. |
| Re-calculate | • Click this button to reset all calculations and start encoding the data again. |
| Save Result | • Click this button to save the current calculations and results for future reference. |
Updated on: 08/05/2024
Calculate ROI to Reduce Cost
1. To calculate your project ROI, click the ‘Calculate ROI’ button.

The ROI Calculator will open on the right side of the page.

Note: To close the ROI Calculator, click either the 'Cancel' button or the 'x' icon located at the top right corner of the ROI Calculator label.
Use the scroll bar to navigate through the remaining details of the ROI Calculator.


2. Click the dropdown below the "Reduce Cost" label to see all the categories you can reduce.

3. Click on one of the options to select a category.
The category you selected will be displayed in the label box.

4.Start adding values to the text boxes by clicking on them and entering your desired number.

Note: To reset all the values, click the ‘Re-calculate’ button.
5.Once you're satisfied with the result, click the "Save Result" button.
A message will appear at the bottom of your screen confirming that your ROI result has been saved successfully.
Calculate ROI Reduce Cost
1. To calculate your project ROI in 3 years, click the ‘Calculate’ button under the Est. Challenge column.

2. The ROI Calculator will appear on the right side of the page.
Use the scrollbar to navigate through the remaining ROI Calculator details.

Note: To close the ROI Calculator, click either the 'Cancel' button or the 'x' icon located at the top right corner of the ROI Calculator label.
3. Tap on the text boxes under the Est. Weight, Input, and Est. Challenge columns to edit or add your desired values.
4. Once you're satisfied, click the ‘Save Result’ button.

Note: To reset all the values, click the ‘Re-calculate’ button.
5. A message will appear at the bottom of your screen confirming that your progress has been saved successfully.
Reference Material
| Feature | Description |
|---|---|
| Re-calculate | • Reset all the values. |
| Save Result | • Saves the estimated cost for your project. |
| Cancel | • Closes the ROI Calculator page. |
Updated on: 08/05/2024